TBS-002 — A Pinhole Camera for the Classroom¶
Design for Educational Use¶
A classroom-ready design for teaching pinhole photography — its process and its craft — to students from elementary school through college. TBS-002 is the hands-on companion to The Big Shoebox Project (TBS-001): the same optics, the same cyanotype chemistry, the same light-to-image process, scaled from a 20-foot shipping container down to two cardboard moving boxes. In one class period plus a sunny afternoon, a class builds a working camera and every student takes home a real photograph — a deep Prussian-blue cyanotype print on watercolor paper, about 10 × 14 inches. No darkroom, no enlarger, no film.
Interactive 3D model — the two ghosted cardboard boxes joined with grey tape, the pinhole and its light cone, and three clickable parts: the shutter (lifts to expose), the film-plane panel (folds down to coat / up to expose), and the prep-box top flaps (open to remove the print). Drag to orbit, scroll to zoom.
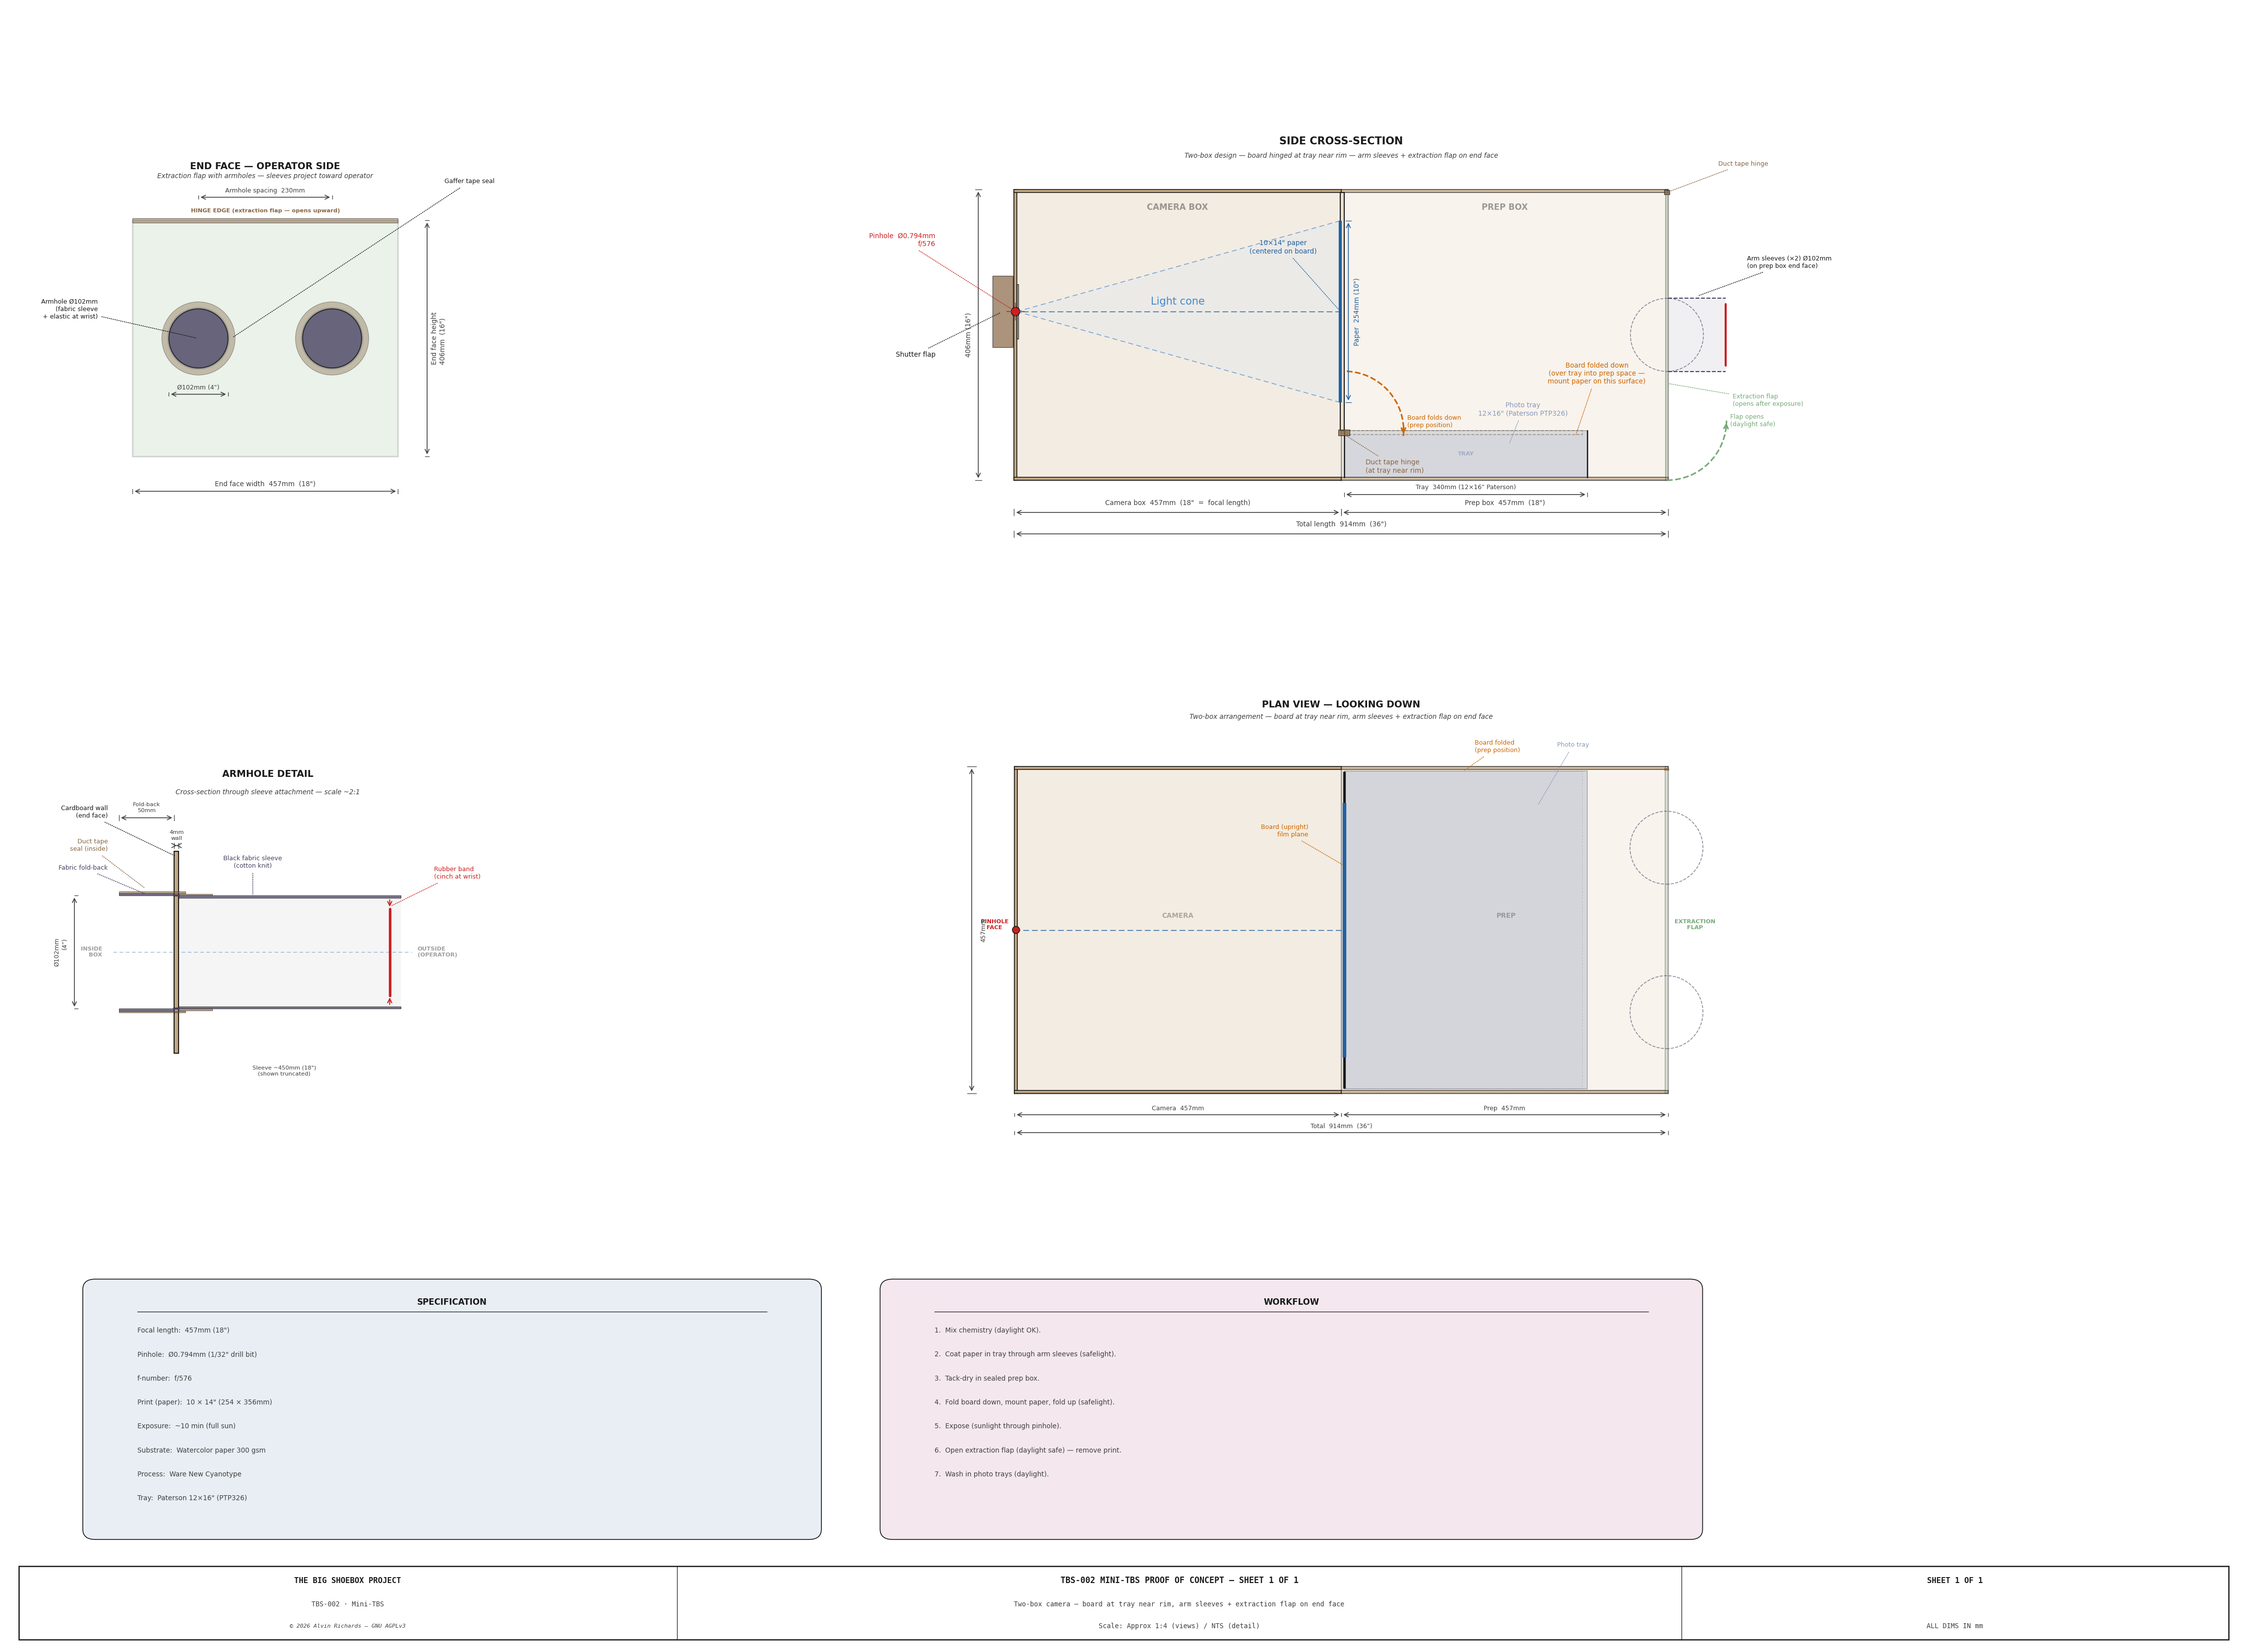
The camera is two U-Haul Medium boxes joined end-to-end: a sealed camera box (the pinhole, and the dark interior where the image forms) and a light-sealed prep box (the coating workspace). The film plane is a panel cut from the wall between the two boxes, hinged along its bottom edge: it folds down into the prep box to hold the paper for coating, then folds up to stand facing the pinhole during exposure. The prep box's end face carries two arm sleeves — students reach in to coat the paper in the dark without opening the box — and the finished print is lifted out in daylight through the box's own top flaps (the boxes are built flaps-up, and joined with grey tape). The camera is its own darkroom, so the whole activity happens in a normal classroom.
📄 Printable Instructions (PDF) — the complete teaching and build guide as a print-ready booklet to download and hand out.
Part I — Teaching with the Camera¶
1. The Teaching Case¶
Pinhole photography is a rare lesson that is genuinely cross-curricular and ends with something each student keeps:
- Physics — light travels in straight lines; a small hole forms an image with no lens; a smaller hole is sharper but dimmer (a trade-off students can see and measure).
- Chemistry — a real photochemical reaction: ultraviolet light reduces iron(III) to iron(II), which forms a blue pigment, and "development" is nothing but water.
- Math — the pinhole-diameter formula and the exposure-scaling law are short, honest calculations with a visible result.
- Art and history — composition and framing, and a 180-year-old process (the original "blueprint") that predates film.
The barrier to entry is low: about $110–175 for a class set of ~20 prints, no darkroom, and — handled as described in §10 — a chemistry set that is safe for a supervised classroom. And it scales with the students: a teacher can build the camera and run it as a demonstration for young children, or hand the full design to a college class to build, calibrate, and characterize themselves.
At a glance — what it takes to run in a class:
| Classroom reality | |
|---|---|
| Build (one-time) | ~1–2 hours; the camera is reusable for years |
| Per-print session | ~30 min hands-on + 10–40 min unattended exposure + ~15 min wash |
| Group size | 2–4 students per camera; a class set is 1–2 cameras run in rotation |
| Cost | ~$110–175 for the build and first ~20 prints (≈$6–10 per print in consumables thereafter) |
| Space | A normal classroom, a sunny outdoor spot, and a sink |
| Consumed per print | Watercolor paper and a few ml of sensitizer — the camera and tray are not |
2. What Students Learn¶
By the end, a student can explain how a camera forms an image without a lens, why the picture is upside-down, why the exposure takes minutes instead of an instant, and how sunlight drives a chemical change that water then reveals. How far each idea is pushed scales with the grade:
| Grade band | What students do | What to emphasize | Teacher's role |
|---|---|---|---|
| Elementary (K–5) | Compose the shot, help coat the paper, time the exposure, rinse the print and watch the blue appear | Light goes straight; a tiny hole makes an upside-down picture; sunlight causes a change you can watch happen | Build the camera; mix and handle all chemistry |
| Middle (6–8) | Coat paper, run the exposure and a bracket, develop and compare the results | The sharp-vs-bright pinhole trade-off; why the image inverts; bracketing as the scientific method | Mix the stock solutions; supervise gloved handling of the diluted working solution |
| High school (9–12) | Build the camera, derive the pinhole size and exposure from the formulas, mix and use chemistry with PPE | The Rayleigh optimum, the f-number, why cyanotype needs no reciprocity correction, the iron redox reaction | Supervise; act as chemistry safety officer |
| College | Treat the design as an engineering brief — build, measure (angle of view, resolution, exposure calibration), and extend it | Full derivations, error analysis, and the link back to the container-scale TBS-001 | Facilitate; set the characterization goals |
3. The Process — How a Pinhole Makes a Photograph¶
The whole process is three ideas — geometry, photochemistry, and time:
- Geometry. Light travels in straight lines. A tiny hole in the front of the box lets a narrow ray from each point of the scene reach the back wall, so an upside-down, left-right-reversed image of the world forms there — no lens required. A smaller hole gives a sharper but dimmer image; a larger hole, brighter but blurrier. There is a "best" size, and students can compute it (§7).
- Photochemistry. The back wall holds watercolor paper brushed with a pale yellow-green, UV-sensitive iron solution. Where sunlight strikes, ultraviolet light reduces the iron and sets the chemistry that will become blue.
- Time. A pinhole passes very little light, so the shutter stays open for minutes in full sun — long enough that the class watches the exposure happen. Nothing may move during the exposure, or the image smears.
- Development in water. Rinsing the exposed paper in plain cold water washes away the unreacted chemistry and leaves Prussian blue wherever the light struck. The image appears in the wash and keeps deepening as it dries — no darkroom chemicals at all.
4. The Type — Cyanotype, and the Family It Belongs To¶
This design makes a cyanotype — one of the oldest photographic processes (Sir John Herschel, 1842) and the original "blueprint." It is chosen for the classroom because it is the friendliest of the historic alternative (non-silver) processes: sensitized by ordinary sunlight, developed in plain water, forgiving of timing, and low in toxicity relative to darkroom chemistry.
Where it sits in the larger picture:
- It is lensless (pinhole) photography making a camera image — a real scene projected through a hole — not a photogram or a contact print.
- It belongs to a family of alternative processes (Van Dyke brown, salt print, palladium) that share the same coat–expose–wash workflow. Cyanotype is the entry point; a class that masters it can move to the others on the same paper.
- It is the same process as TBS-001, at container scale — students can point to the 20-foot version and say "same physics, just 5× the focal length and roughly 25× the exposure."
Teaching extensions once the basic print works: change the subject or the exposure (bracketing); enlarge or shrink the pinhole to trade sharpness for speed; tone the finished blue print brown with tea or tannin; or graduate to a second alternative process on the same equipment.
5. Running a Session¶
Once the camera is built — a one-time project of about one to two hours (Part II) — every printing session runs the same three-step loop the container-scale TBS-001 uses, just at classroom speed. A session fits inside a single class period plus an unattended exposure window.
| Step | Where | Time | Student roles |
|---|---|---|---|
| 1. Coat | Inside the prep box (its own darkroom) | ~10 min + 15 min tack-dry | Reaching through the arm sleeves, one student brushes the sensitizer onto the paper (§11); another times the dry. |
| 2. Compose and expose | Outdoors, full sun | 10–40 min, unattended | The group aims the camera and opens the shutter (§12); the wait is the lesson — nothing may move. |
| 3. Develop | Indoors or shade, then daylight | ~15 min wash, then dry | One student rinses the print in plain water while the class watches the blue appear (§13). |
Make it an experiment. The single most valuable thing a class can do is bracket the first exposure — make three prints of the same scene at the calculated time, at +50%, and at −25% (§8) — then compare them and reason about which is right and why. That is the scientific method in one afternoon: predict with the formula, change one variable (time), observe the result, and draw a conclusion. Older students extend it — vary the pinhole diameter, the subject contrast, or the sky conditions, and record what each change does.
Keeping a class busy. Two to four students share one camera; a class set is one or two cameras. While one group's print exposes outside, another coats the next sheet, so a single camera keeps a whole class working across a period.
Part II — Building and Running the Camera¶
Part II is the build-and-run reference — box selection and optics (§6–8), construction (§9), the chemistry and its classroom safety (§10), coating and exposure (§11–12), and development (§13) — followed by troubleshooting, a bill of materials, and sources. Every technical figure traces to the same peer-reviewed references used for TBS-001.
6. Box Selection¶
Recommended: U-Haul Medium Box¶
| Parameter | Value |
|---|---|
| Box dimensions | 18 × 18 × 16 inches (457 × 457 × 406mm) |
| Supplier | U-Haul, Home Depot, Lowe's |
| Cost | ~$4–5 |
Quantity needed: 2 (one camera box, one prep box).
Orientation: Pinhole on one 18 × 16" face. Film plane on the opposite 18 × 16" face. The 18-inch (457mm) dimension becomes the focal length. The second box attaches at the film plane face to serve as the prep/coating area.
Why this box:
- 457mm focal length gives a practical f-number and ~10 min exposure in full sun
- 10 × 14" usable print area is large enough to be visually compelling
- Standard item, universally available, inexpensive
- Rigid enough when taped and reinforced
- Two identical boxes mate perfectly at the shared face
Alternative: U-Haul Large Box¶
| Parameter | Value |
|---|---|
| Box dimensions | 24 × 18 × 18 inches (610 × 457 × 457mm) |
| Focal length | 457mm (same — use the 18" depth) |
| Film plane | 24 × 18" (610 × 457mm) |
| Usable area | ~20 × 16" (~2.2 sq ft) |
| Cost | ~$6–8 |
The Large box uses the same 18" depth (same f-number) but a larger film plane and more interior room — print on the same 10 × 14" paper, or a larger sheet for a more dramatic proposal print.
7. Optical Specification¶
All derivations use the Lord Rayleigh formula for optimal pinhole diameter:
$$d = 1.9 \sqrt{f \lambda}$$
where f is focal length in mm and λ = 0.00055mm (550 nm green light).
Source: Rayleigh, J.W.S., "On Pin-hole Photography," Philosophical Magazine, Ser. 5, Vol. 31, 1891, pp. 87–99. Applied identically to the TBS-001 specification in the Pinhole Optics Report.
Mini-TBS Optical Parameters¶
| Parameter | Value | Derivation |
|---|---|---|
| Focal length (f) | 457mm | Box depth (18") |
| Rayleigh optimal d | 0.95mm | 1.9 × √(f × 0.00055) |
| Drill bit used | 1/32" (0.794mm) | Closest Home Depot standard |
| Actual pinhole Ø | ~0.80mm | Drill bit through aluminum can |
| f-number | f/576 | f / d |
| Film plane | 406 × 457mm | Box face |
| Usable image area | 254 × 356mm | Paper size (centered on the film plane) |
| Angle of view (diag.) | ~53° | 2 × arctan(half-diag / f) |
Pinhole undersizing note: The 1/32" drill bit produces a hole 16% smaller than the Rayleigh optimal. This means slightly less light throughput (longer exposure by ~10%) but slightly sharper image — the geometric blur circle is smaller while the diffraction blur increases only marginally. At this scale, the trade is favorable. (Renner, E., Pinhole Photography, 4th ed., Focal Press, 2009, Ch. 2.)
Resolution¶
Using the Rayleigh resolution criterion (see Pinhole Optics Report §7):
$$\text{Resolution} = \frac{d}{2 \times 1.22 \times \lambda \times f}$$
For Mini-TBS: 0.794 / (2 × 1.22 × 0.00055 × 457) ≈ 1.3 lp/mm
This is sufficient for a contact print viewed at arm's length — cyanotype on watercolor paper does not resolve finer detail than this.
8. Exposure Calculation¶
Where to Start¶
A pinhole cyanotype is a slow exposure — minutes, not an instant — because the tiny hole passes very little light. There is no single "correct" time: it depends on how strong the sun is, the paper, and how fresh the sensitizer is. So a class finds the exposure the way photographers always have — start from a practical estimate and bracket around it.
Starting point for this camera: about 10 minutes in full summer sun (clear sky, mid-day). As pinholes go, this camera's f/576 aperture is relatively bright; a narrower hole or a deeper box would need proportionally longer.
The f-number Sets the Pace¶
Exposure scales as the square of the f-number — the same law that governs every camera:
$$t \propto (f\text{-number})^2$$
This is the exposure-scaling calculation students can do on paper. Say a class drills a sharper, half-size pinhole: that doubles the f-number, and because exposure grows as its square, the new time is 2² = 4× longer — the ~10-minute print becomes ~40 minutes. Sharper but slower — a trade they can predict on paper and then check in the sun.
Reciprocity — No Correction Needed¶
Cyanotype is an iron-based process and does not exhibit classical Schwarzschild reciprocity failure, so its response stays linear even over these multi-minute exposures — the estimate holds without a long-exposure fudge factor. (See Pinhole Optics Report §6.)
This is a real advantage of cyanotype for pinhole work: a silver gelatin paper at f/576 would need a Schwarzschild correction (p ≈ 0.85), roughly doubling the exposure.
Adjust for Conditions¶
Multiply the full-sun starting time by these factors (Operating Manual §3.1):
| Condition | Multiplier | Exposure |
|---|---|---|
| Full direct sun (10:00–14:00, summer) | ×1.0 | ~10 min |
| Thin haze / milky sky | ×1.5 | ~16 min |
| Broken cloud (50% coverage) | ×2.0 | ~21 min |
| Heavy overcast | ×4.0 | ~42 min |
| Early morning / late afternoon | ×2.0 | ~21 min |
| Winter sun at mid-latitude | ×1.5 | ~16 min |
For compound conditions, multiply the factors: thin haze + early morning = ×3.0 → ~32 min.
First session: Choose a clear-sky day between 10:00 and 14:00 and bracket — make three prints of one scene at ~10 min, +50% (15 min), and −25% (8 min), then compare. This finds the real exposure for your paper, sun, and chemistry, and it is the scientific-method activity described in §5.
9. Construction¶
9.1 Two-Box Assembly¶
The Mini-TBS uses two identical U-Haul Medium boxes joined end-to-end:
- Camera box (left in diagram): Sealed, light-tight. Contains the pinhole and light cone. The hinged panel stands in the opening as the film plane during exposure.
- Prep box (right in diagram): Light-sealed workspace for chemistry, coating, and drying. Its end face carries the arm sleeves; the finished print is removed in daylight through the box's own top flaps (§9.7).
The two adjacent walls between the boxes become the film-plane mechanism. On the camera box, a rectangular window is cut out and removed. On the prep box, a matching rectangle is cut on three sides only — the bottom edge is left attached as a hinge. The window is sized to the 10 × 14" print (about 16 × 11"), not the whole wall, and is centered on the face so the pinhole lines up with the middle of the sheet. The panel folds down into the prep box for coating, then folds back up to stand in the window as the film plane, facing the pinhole. No separate board is needed: the film plane is the box's own cardboard. Arm sleeves on the prep box end face give the operator sealed access to coat and mount paper.
Procedure:
- Assemble both boxes, but build them flaps-up — orient each box so its opening flaps are on top (the prep box's become the print-extraction opening). Tape the bottom flaps shut on both boxes.
- Stand the boxes end-to-end so that two 18 × 16" faces are adjacent.
- On the camera box's adjacent face, cut out a rectangular window sized to the print (~16 × 11"), set in the upper part of the face, and remove it. This is the opening through which the image reaches the paper.
- On the prep box's adjacent face, cut the matching ~16 × 11" rectangle in the same position, on three sides only, leaving the bottom edge uncut as the hinge. Its bottom edge sits about 64mm above the floor, centering the panel on the face (detailed in §9.3).
- Tape the camera box's top flaps shut (light-tight — this end stays sealed). Leave the prep box's top flaps as the extraction opening (§9.7): they open in room light to load paper and chemistry and to remove the print, and are taped shut with masking tape during the dark coating and the exposure.
- Tape the two boxes together at the junction using duct tape on all four outer edges — floor, ceiling, and both side walls. The taped joint must be rigid, and the two window openings must line up.
9.2 Light-Sealing the Camera Box¶
Only the camera box needs to be light-tight. The prep box remains open.
Materials: Black duct tape, 2" × 30 yd (one roll covers all sealing, hinging, and light-proofing for the entire build).
Procedure:
- Seal every external seam on the camera box with a full strip of black duct tape. Pay special attention to:
- All four flap edges on the pinhole face
- Every corner where two panels meet
- The manufacturer's glued seam (usually one long edge)
- Cut 2-inch squares of cardboard and tape them over every 3-plane corner junction. These are the worst light-leak points.
- Apply a second layer of tape on all internal seams.
- Light-leak test: In a dark room, place a bright flashlight inside the sealed camera box (with the hinged flap upright). Inspect every seam from outside. Mark and seal any visible light.
9.3 Hinged Film-Plane Panel¶
The film-plane panel is the cardboard flap cut into the prep box's camera-side wall (§9.1), sized to the 10 × 14" print and centered on the face so the pinhole lines up with the middle of the sheet. It is hinged along its bottom edge, about 64mm up the wall. Folded up, it stands in the window as the film plane with the paper facing the pinhole; folded down, it lies horizontal in the prep box as the surface on which the pinned paper is coated. The arm sleeves are on the prep box end face (§9.6), not on the panel.
Materials: - [ ] Duct tape (same roll used for all sealing and hinging — it also reinforces the panel hinge, and can line the prep-box floor as a drip liner) - [ ] Push pins / map pins (~8 per print, reusable — mount the paper to the panel) - [ ] Binder clips (1-inch, a few — hold the panel upright in the window)
The film-plane panel needs no material of its own — it is cut from the prep box's camera-side wall (§9.1).
Procedure:
- (Optional) Line the prep-box floor with overlapping strips of duct tape (the same roll) as a wipeable drip liner — it protects the cardboard from coating runoff over repeated sessions.
- The panel is already cut (§9.1, step 4): the ~16 × 11" flap in the prep box's camera-side wall, still attached along its bottom edge about 64mm above the floor, centered on the face.
- Hinge: Reinforce the bottom fold line with a full-width strip of duct tape on both faces so it flexes cleanly. Score the fold lightly first if the cardboard is stiff. This is a working hinge that will be folded repeatedly.
- Folded-down position (prep): Fold the panel down into the prep space, where it lies horizontal — a flat surface for coating the pinned paper, clear of the floor.
- Exposure position: Fold the panel up until it stands vertical in the window, filling the opening with the paper facing the pinhole. Hold it upright with duct tape tab at the top edge.
- Test the hinge: Fold the panel up and down 10–15 times. It should move freely without binding, and the taped hinge should not crack or separate.
9.4 Pinhole Fabrication¶
Materials: - [ ] Aluminum beverage can (empty, clean, dry) - [ ] 400-grit and 600-grit sandpaper - [ ] 1/32" (0.794mm) drill bit - [ ] Pin vise (hand-held chuck for small drill bits — ~$5 at Home Depot)
Procedure:
- Cut a 3 × 3 inch piece from the flat side wall of an aluminum beverage can using scissors. Avoid the curved top and bottom.
- Sand both sides with 400-grit sandpaper to remove the printed coating and any burrs. The aluminum should be clean bare metal, approximately 0.1mm thick.
- Place the aluminum on a firm surface (hardwood or a book — not glass, which can chip the bit).
- Insert the 1/32" drill bit into the pin vise. Center the bit on the aluminum piece.
- Drill slowly — rotate the pin vise by hand with light pressure. Do not use a power drill (the bit will wander and the hole will be oversized or oblong).
- After the bit breaks through, flip the aluminum and lightly sand the exit side with 600-grit to remove the raised burr collar.
- Hold the finished pinhole up to a light source and inspect with a magnifying glass or loupe. The hole should be round, clean-edged, and centered.
- Drill 3–4 test pinholes. Select the cleanest, most circular one.
Mounting:
- Cut a 2 × 2 inch square hole in the center of the pinhole face (the 18 × 16" face).
- Center the aluminum pinhole plate over this hole on the inside of the box.
- Tape all four edges with black duct tape. The tape must be light-tight — overlap the aluminum by at least 1/2 inch on all sides.
9.5 Shutter¶
A simple flap shutter:
- Cut a 4 × 4 inch piece of stiff black cardboard (or 4 layers of black duct tape on regular cardboard).
- Tape the top edge of the flap to the box exterior, directly above the pinhole. The flap hangs down covering the pinhole.
- To expose: Lift the flap and tape it open above the pinhole. Start the timer.
- To end exposure: Untape the flap, let it drop. Smooth it flat over the pinhole.
9.6 Arm Sleeves (on Prep Box End Face)¶
The armholes are on the prep box end face — the operator's face. They are centered on the face, spaced 9 inches (230mm) apart. This gives sealed arm access for mixing the sensitizer, coating the pinned paper, and folding the panel up — all in the dark, without opening the box or breaking the light seal. This is what lets the Mini-TBS work as its own darkroom, with no darkened room.
Materials: - [ ] Black opaque fabric (cotton knit from a black t-shirt works well) - [ ] Heavy-duty rubber bands or elastic hair ties - [ ] Black duct tape
Procedure (see armhole detail in the engineering drawing):
- Cut two armholes in the prep box end face, each approximately 4 inches (102mm) in diameter. Space them 9 inches (230mm) apart center-to-center, centered on the face. Use a compass to trace the circle, then cut with a box cutter. Sand or trim any rough edges — the fabric will fold over this edge.
- Cut two sleeve tubes from black fabric: each approximately 18 inches (450mm) long and 6 inches in diameter (circumference ~19 inches). A t-shirt sleeve, cut at the shoulder seam, gives roughly the right dimensions.
- Attach the sleeve to the wall (see detail cross-section):
- Insert the sleeve through the armhole from the outside.
- Pull approximately 2 inches (50mm) of fabric through the hole and fold it back onto the inside surface of the cardboard wall. The fabric wraps over the cut edge of the hole, creating a smooth, sealed transition.
- Tape the fold-back down with a full ring of 2-inch black duct tape on the inside surface, covering the folded fabric completely. Press firmly — this is the primary light seal.
- Apply a second ring of duct tape on the outside surface where the sleeve exits the wall, overlapping the fabric and cardboard by at least 1 inch (25mm). This prevents the sleeve from pulling away under tension.
- Wrist seal: When in use, insert your arms through the sleeves and cinch heavy-duty rubber bands or elastic hair ties around your forearms to seal the openings. The cinch point should be snug enough to block light but not restrict circulation.
- Test: Insert your arms through the sleeves and verify you can reach the film-plane panel and handle the paper and pins with both hands. In a darkened room, shine a flashlight at the armhole from outside — check for any light leaks around the tape seal rings. Re-tape any gaps.
Alternative — glovebox sleeves (built and tested). Instead of fabric sleeves cinched with rubber bands, build a sealed glovebox: the gloves are attached to the sleeves, so no one needs their own gloves and there is no wrist band to fuss with — and a closed glove seals the hand opening more reliably than a rubber-band cinch.
Materials: a heavy-duty black contractor bag (3-mil, opaque), one pair of extra-large rubber gloves, black duct tape.
- Cut two rectangles from the bag; roll each into a tube and duct-tape the long seam — two opaque arm tubes (~18" long).
- Glove end (goes inside the box): slip a rubber glove's cuff over one end of each tube and duct-tape it sealed. Your hand pushes into the glove.
- Box end (outside): thread the tube out through the armhole, cut ~1-inch slits around the outer end so it fans into tabs, and duct-tape the fanned tabs flat to the outside of the box around the armhole.
- Use: push your arms into the tubes and into the gloves, and work sealed inside — exactly like a lab glovebox.
Use a black, opaque bag (a translucent one leaks light), double-tape the seams, and check the gloves for pinholes before each session — they are now the chemical PPE. This removes the wrist rubber bands and the per-session disposable gloves entirely.
9.7 Print Extraction — the Prep-Box Top Flaps¶
Because the boxes are built flaps-up (§9.1), the prep box's own top flaps are the extraction opening — no custom-cut wall is needed. After exposure the cyanotype print is no longer UV-sensitive and can be handled in full daylight, so the top flaps simply fold open to lift the print out.
Procedure:
- During the dark steps (mixing, coating, tack-drying) and the exposure, fold the prep box's top flaps shut and tape them closed with masking tape so the box is light-tight. (Masking tape peels cleanly for repeated opening — the duct tape is saved for the permanent joints.)
- To load or extract (room light / daylight-safe): peel the masking tape and fold the top flaps open. Before coating this is how you pin the paper and set the chemistry inside; after exposure it is how you fold the panel down, unpin the print, and lift it out to wash externally (§13).
Note: The top flaps only need to be light-tight from the moment you mix the sensitizer until the exposure ends. Before that (loading dry paper and chemistry) and after it (removing and washing the print), they can be open in room light.
9.8 Substrate: Watercolor Paper¶
Watercolor paper is cyanotype's original and most forgiving substrate — Herschel's first prints in 1842 were on paper, and it is still the easiest surface to coat and print evenly. For the 10 × 14" classroom prints it is ideal: it lies flat without stretching, absorbs the sensitizer uniformly, needs no pre-treatment, and comes in standard sheets that require no cutting (one per print). Only two properties really matter — enough weight that it doesn't curl when wet, and 100% cotton fiber so the iron chemistry doesn't attack it.
Recommended paper: Arches Aquarelle hot-press, 140 lb (300 gsm), 100% cotton. Available as 10 × 14" blocks and pads at Blick Art Materials, Joann, or Amazon — a standard size, no cutting needed (one sheet per print).
Alternative: Fabriano Artistico hot-press, 140 lb (300 gsm), 100% cotton — also in 10 × 14" blocks.
Requirements: - [ ] Weight: 140 lb / 300 gsm minimum. Lighter paper curls severely when wet. - [ ] Fiber: 100% cotton (rag paper). Wood-pulp paper degrades in the iron chemistry. - [ ] Surface: Hot-press (smooth). Cold-press texture interferes with fine detail at this resolution.
Mounting the paper: The paper is pinned to the panel dry, before coating — the point of the sequence in §11, since pinning a dry sheet with the prep box top open is far easier than mounting a wet, coated one in the dark.
- With the prep box top flaps open, fold the panel down and center the dry 10 × 14" sheet on it (landscape — 14" across, 10" tall — it sits well within the ~16 × 11" panel).
- Fasten it with push pins (map pins or thumbtacks) pressed through the paper into the cardboard panel — one near each corner, plus one at the middle of each long edge. The pins sit flush and hold the paper when the panel stands vertical, and they leave the panel edges clear so it seats squarely in the window when folded up. (Binder clips would foul the window frame and the hinge and hold the panel off the opening.) Place the pins in the ~1" bare margin around the paper so their heads sit at the edge of the image.
The panel is then coated in place and folded up when dry (§11).
10. Chemistry¶
Classroom Safety¶
Cyanotype is one of the lowest-hazard photographic chemistries, but it is still chemistry — read this before any class handles it, and match the handling to the grade band in What Students Learn.
- Who handles what. The teacher weighs and dissolves the dry powders and mixes the stock solutions; students handle only the diluted working solution (and only from middle school up). For elementary classes, the teacher does all chemistry and students coat, expose, and wash.
- PPE. Nitrile gloves and eye protection whenever the powders or solutions are handled; the finished, washed print is inert and safe to touch bare-handed. If you build the glovebox-sleeve alternative (§9.6), its integral gloves are the in-box coating PPE — keep one nitrile pair for the teacher's dry-stock mixing.
- Potassium ferricyanide is low-toxicity but must never be mixed with acids (that can release hydrogen cyanide) — keep it away from acidic cleaners and vinegar. It is an eye/skin irritant as a powder.
- Omit ammonium dichromate entirely in a school setting — it is a Category 1A carcinogen (see the note below). The prints work well without it.
- Ventilation and disposal. Mix in a ventilated area. The blue-green wash water is dilute and non-toxic but should not go down a storm drain in quantity; dilute heavily and dispose per your district's guidance.
- Keep a printed Safety Data Sheet for each chemical on hand, and have students record hazards as part of the lesson.
Ware New Cyanotype Formula¶
The same formula used for TBS-001. Source: Ware, M., Cyanotype: The History, Science and Art of Photographic Printing in Prussian Blue, Science Museum, 1999. Full details in the Chemistry Shopping List.
Stock Solutions¶
Part A — Ammonium Iron(III) Oxalate:
| Ingredient | Quantity |
|---|---|
| Ammonium iron(III) oxalate (ferric ammonium oxalate) | 30 g |
| Warm water (50–60°C) | 75 ml |
Dissolve AmFe in warm water (not boiling) with continuous stirring, 3–5 minutes, until clear pale yellow-green solution. Cool to room temperature. Store in a dark bottle. Shelf life: 6–8 weeks.
Part B — Potassium Ferricyanide:
| Ingredient | Quantity |
|---|---|
| Potassium ferricyanide | 8 g |
| Room-temperature water | 100 ml |
Dissolve with stirring until bright orange-red. Store in a dark bottle, away from Part A. Shelf life: 6–8 weeks.
Omit in schools: Ammonium dichromate (a contrast enhancer, ~1 g per batch) is used in the full TBS-001 formula but is left out of the classroom design. It is a Category 1A carcinogen and has no place in a school setting. The prints work well without it — contrast is slightly lower but more than adequate for classroom work.
Working Sensitizer¶
Mix equal volumes of Part A and Part B immediately before use. The mixed solution is UV-sensitive — mix and use it inside the sealed prep box, away from daylight.
Per print: ~4 ml working sensitizer (2 ml Part A + 2 ml Part B), double-coated.
For 20 prints + 25% overage: 100 ml total working sensitizer (50 ml Part A + 50 ml Part B).
Working life: 4–6 hours after mixing. Discard unused mixed solution.
11. Coating Procedure¶
Environment: Coat in the dark, by feel. The mixed sensitizer is UV-sensitive, so mixing and brushing both happen inside the light-sealed prep box, reached through the arm sleeves. The box is opaque, so you work by touch — no safelight is needed (and one wouldn't help; you can't see inside anyway). The box is the darkroom, so the room around it can stay normally lit. Only the setup (pinning the paper, loading the unmixed chemicals) is done with the prep box top flaps open.
Materials: Foam brush (2-inch), a mixing cup plus two small cups for measuring, push pins, a 10 × 14" watercolor sheet, and the Part A / Part B stock solutions.
Coating on the panel: The paper is coated where it will be exposed — pinned flat to the film-plane panel (§9.8), folded down horizontal. Any drips fall to the prep-box floor (line it with duct tape for a wipeable surface). Everything is reached through the arm sleeves on the prep box end face (§9.6).
Procedure (from Operating Manual §2.3):
- Load (top flaps open). Fold the panel down and pin the dry watercolor sheet to it (§9.8). Set what you need inside the prep box, within reach of the sleeves: the foam brush, the mixing cup, and ~2 ml each of Part A and Part B measured into two small cups (kept separate — unmixed, they are not yet light-sensitive).
- Seal the box. Fold the prep box top flaps shut and tape them closed with masking tape. Inside is now fully dark; you work by feel from here.
- Mix, in the dark. Through the sleeves, pour Part A and Part B together in the cup and stir. This working sensitizer is UV-sensitive — from here it stays in the sealed box until after exposure.
- Coat — two passes. Load the foam brush evenly. First pass: brush horizontally, 50% overlap, top to bottom. Second pass: brush vertically, 50% overlap — the cross pass evens the coat. Touch up the four edges, which foam brushes tend to undercoat.
- Tack-dry. Leave the paper on the panel 15–20 minutes
- Fold up — ready. Through the sleeves, fold the panel up into the exposure position, paper facing the pinhole. The box stays sealed; the camera is loaded and ready to expose (§12).
Humidity notes (from Operating Manual §1.5):
| Humidity | Action |
|---|---|
| Below 30% | Lightly mist paper with plain water 5 min before coating |
| 30–65% | Coat normally |
| Above 70% | Delay — high humidity raises the fogging risk |
12. Exposure Procedure¶
- With the paper coated, dry, and the panel folded up (§11), verify the panel stands upright in the exposure position, paper facing the pinhole. Secure the top edge with a binder clip or duct tape tab if it needs holding.
- Ensure the prep box top flaps are folded shut and taped (masking tape). The prep box should be light-tight.
- Ensure the shutter flap is closed.
- Carry the entire assembly outside. Position it on a stable surface (table, ground) with the pinhole facing the subject.
- Subject selection: For the first test, choose a high-contrast scene — a sunlit building against blue sky, or a bright landscape with distinct shapes. Avoid scenes dominated by shadow.
- Open the shutter. Start the timer.
- Do not move the assembly during exposure. Do not stand in front of the pinhole or allow shadows to cross it.
- At the calculated exposure time, close the shutter.
- Bring the assembly inside or into shade.
13. Development¶
Cyanotype develops in plain cold water. No fixer, no stop bath, no chemicals beyond water.
Procedure (from Operating Manual §4.2):
- Open the prep box top flaps (see §9.7). After exposure, cyanotype is no longer light-sensitive — full daylight during removal is safe. Fold the film-plane panel down from the upright position, unpin the paper from the panel, and lift the print out through the top.
- Wash 1: Submerge the print in cold water in the tray for 5 minutes, agitating gently. The water turns yellow-green as unreacted sensitizer clears — normal and non-toxic.
- Wash 2: Empty the tray, refill with fresh cold water, and wash 5 more minutes.
- Wash 3: Empty and refill once more for a final 5-minute rinse.
- Visual check after wash 2: The image should be clearly visible as deep Prussian blue shadows against white/off-white highlights.
- If faint: underexposed → increase time by 50% on next print
- If dark with no highlight detail: overexposed → reduce time by 30%
- If pale when wet: may darken significantly on drying — wait before judging
Drying¶
- Lay the print flat on a clean surface (horizontal — watercolor paper stays flat naturally). Alternatively, hang with clips from one edge.
- Drying time: 20–60 minutes depending on temperature and airflow.
- The final blue color appears approximately 30 minutes after the surface feels dry. The Prussian blue pigment continues to oxidize and deepen in air. Do not judge the final density until the print has dried completely.
14. Troubleshooting¶
| Problem | Likely cause | Fix |
|---|---|---|
| Entire print is pale/white | Massive underexposure or sensitizer degraded | Double the exposure time. Check sensitizer age (>6 hours after mixing = discard). |
| Print is fogged (blue overall, no contrast) | Light leak in box | Re-test all seams in a dark room with a flashlight inside. Seal leaks. |
| Streaky or uneven coating | Insufficient brush overlap or over-dry brush | Use more sensitizer per stroke. Ensure 50% overlap on both passes. |
| Image is sharp in center, soft at edges | Normal for pinhole — expected | No fix needed. Pinhole illumination falls off at edges (cos⁴ law). |
| Image is very dark, no whites | Overexposure | Reduce exposure by 30%. Wash longer (5th wash cycle may help clear highlights). |
| Paper curled during wash | Paper too thin | Use 140 lb (300 gsm) minimum. Let the paper relax flat during final wash. |
| Light leak through prep box | Top flaps or arm sleeves not sealed during exposure | Ensure the top-flap edges are fully taped (masking tape) and the arm sleeves are cinched. |
| Pinhole hole is oblong | Drill bit wandered or too much pressure | Drill a new pinhole on fresh aluminum. Use lighter pressure, slower rotation. |
15. Bill of Materials¶
See the Mini-TBS Shopping List for the complete itemized list with suppliers, prices, and quantities for 20 prints.
Budget summary:
| Category | Low | High |
|---|---|---|
| Boxes + construction (×2) | $10 | $17 |
| Pinhole materials | $8 | $15 |
| Chemistry | $25 | $45 |
| Substrate (watercolor paper) | $45 | $65 |
| Tools + consumables | $9 | $16 |
| Wash tray (Paterson 12×16", ×1) | $11 | $11 |
| Arm sleeves | $0 | $6 |
| Total | $108 | $175 |
16. References¶
All sources cited here are the same peer-reviewed references used throughout the TBS-001 documentation:
- Rayleigh, J.W.S., "On Pin-hole Photography," Philosophical Magazine, Ser. 5, Vol. 31, 1891, pp. 87–99.
- Ware, M., Cyanotype: The History, Science and Art of Photographic Printing in Prussian Blue, Science Museum, 1999. ISBN: 0901805831.
- Renner, E., Pinhole Photography, 4th ed., Focal Press, 2009.
- Born, M. & Wolf, E., Principles of Optics, 7th ed., Cambridge UP, 1999, §8.6.
- Schwarzschild, K., "On the Deviation from the Reciprocity Law in Photography," The Astrophysical Journal, Vol. 11, 1900, pp. 89–91.
- Stroebel, L., Compton, J., Current, I., Zakia, R., Basic Photographic Materials and Processes, 3rd ed., Focal Press, 2009.
- Getty Conservation Institute, Atlas of Analytical Signatures of Photographic Processes — Cyanotype, 2013.