Container Selection & Construction Report¶
Part 1: Why a Shipping Container¶
A shipping container is the closest off-the-shelf structure to a purpose-built large-format pinhole camera that exists commercially. It is:
- Light-tight by design — constructed from continuous welded steel panels to protect cargo
- Structurally rigid — engineered to stack 8 units high at sea under full load
- Dimensionally standardized — every unit conforms to ISO 668, meaning camera dimensions are repeatable and predictable
- Portable and hauled commercially — designed from the ground up to move on standard ISO container chassis trucks
- Available in large quantities across the US — thousands of depots hold inventory; pricing is well-established
Source (dimensions): ISO 668:2020, "Series 1 freight containers — Classification, dimensions and ratings." Available from the International Organization for Standardization. Confirmed via: CHS Container Group USA Dimensions Guide, verified April 2026.
Source (construction): Hapag-Lloyd Container Specification Document: hapag-lloyd.com Container Specification PDF
Part 2: US Roadway Transport — Legal Limits Without Permit¶
The following federal limits govern load dimensions on US Interstate highways without special permits.
| Dimension | Federal Limit | Source |
|---|---|---|
| Width | 8 ft 6 in (102 in) | FHWA Federal Size Regulations |
| Height | 13 ft 6 in (162 in) | FHWA Federal Size Regulations |
| Semi-trailer length | 53 ft | FHWA Federal Size Regulations |
| Gross vehicle weight | 80,000 lbs | FHWA |
Source: Federal Highway Administration, "Federal Size Regulations for Commercial Motor Vehicles," FHWA Freight Management and Operations. ops.fhwa.dot.gov/freight/publications/size_regs_final_rpt/
Important: Individual states may set lower limits on non-Interstate roads. Routes should be confirmed against state DOT databases before transport. The limits above apply to Interstate highways.
Container Compliance with Legal Limits¶
| Container Type | Exterior Width | Exterior Height | Height on Chassis (~4 ft) | Permit Required? |
|---|---|---|---|---|
| 20 ft Standard | 8 ft 0 in | 8 ft 6 in | ~12 ft 6 in | No ✓ |
| 40 ft Standard | 8 ft 0 in | 8 ft 6 in | ~12 ft 6 in | No ✓ |
| 40 ft High Cube | 8 ft 0 in | 9 ft 6 in | ~13 ft 6 in | Borderline ⚠ |
High Cube Warning: A 9'6" container on a standard ISO chassis (approximately 48" deck height) reaches 13'6" total — exactly at the federal limit. Some states enforce 13'0" on non-Interstate routes. Any route deviation from Interstate highways risks requiring a permit. For the no-permit requirement of this project, standard 8'6" containers are the recommended selection.
Part 3: Container Condition Grades¶
Used containers are sold in four grades. The minimum acceptable grade for a pinhole camera is WWT — the container must be fully light-tight before light-sealing modifications can be effective.
| Grade | Description | Suitability |
|---|---|---|
| One-Trip | Used once as cargo, essentially new | Ideal — no existing holes or damage |
| Cargo Worthy (CW) | Certified to marine surveyor standard; passes CSC inspection | Excellent — structurally certified |
| Wind & Watertight (WWT) | No holes; seals intact; doors work; may have dents/rust | Acceptable minimum |
| As-Is | No guarantee; may have holes, floor rot, compromised seals | Not acceptable — holes create light leaks |
Source: CARU Containers FAQ, "What is the difference between Cargo Worthy (CW), Wind & Water Tight (WWT) and As-Is containers?" carucontainers.com
Recommendation: Purchase CW or One-Trip grade. Budget a one-time light-seal inspection (see Part 6) regardless of grade — even certified containers can develop seam gaps under the corrugated roof.
Part 4: The Critical Geometry Decision — Camera Orientation¶
This is the most important design choice. A shipping container can be oriented in two ways as a pinhole camera:
Orientation A: End-to-End (Pinhole on short wall → Image on short wall)¶
SIDE VIEW:
[PINHOLE]━━━━━━ focal length = container length ━━━━━━[IMAGE PLANE]
   8'×8'                    19 ft or 39 ft                    8'×8'
- Focal length = container interior length (19'4" for 20 ft; 39'5" for 40 ft)
- Image plane = one short end wall (interior ~7'9" wide × 7'10" tall)
- Field of view = approximately 22° horizontal (very narrow/telephoto)
- Result: small image (under 8' wide), very long exposures
Orientation B: Side-to-Side (Pinhole on long wall → Image on long wall)¶
TOP VIEW:
[LONG WALL = IMAGE PLANE]
          ↑
 7'9" focal length
          ↑
[LONG WALL = PINHOLE]

Container doors (for loading) are on the SHORT ENDS — completely separate from the optical path.
- Focal length = container interior width (7'9" = 2,362mm for both 20 ft and 40 ft)
- Image plane = entire interior of one long wall
- Image width = container interior length (~19'4" for 20 ft; ~39'5" for 40 ft)
- Field of view = 102° horizontal for 20 ft container; 137° for 40 ft container
- Result: large panoramic image, practical exposure times
Orientation B is the approach used in this document. It produces images in the 20'+ range, uses the container length as image width, and keeps the access doors operationally separate from the camera.
Part 4A: Container Interior Layout — Top Elevation¶
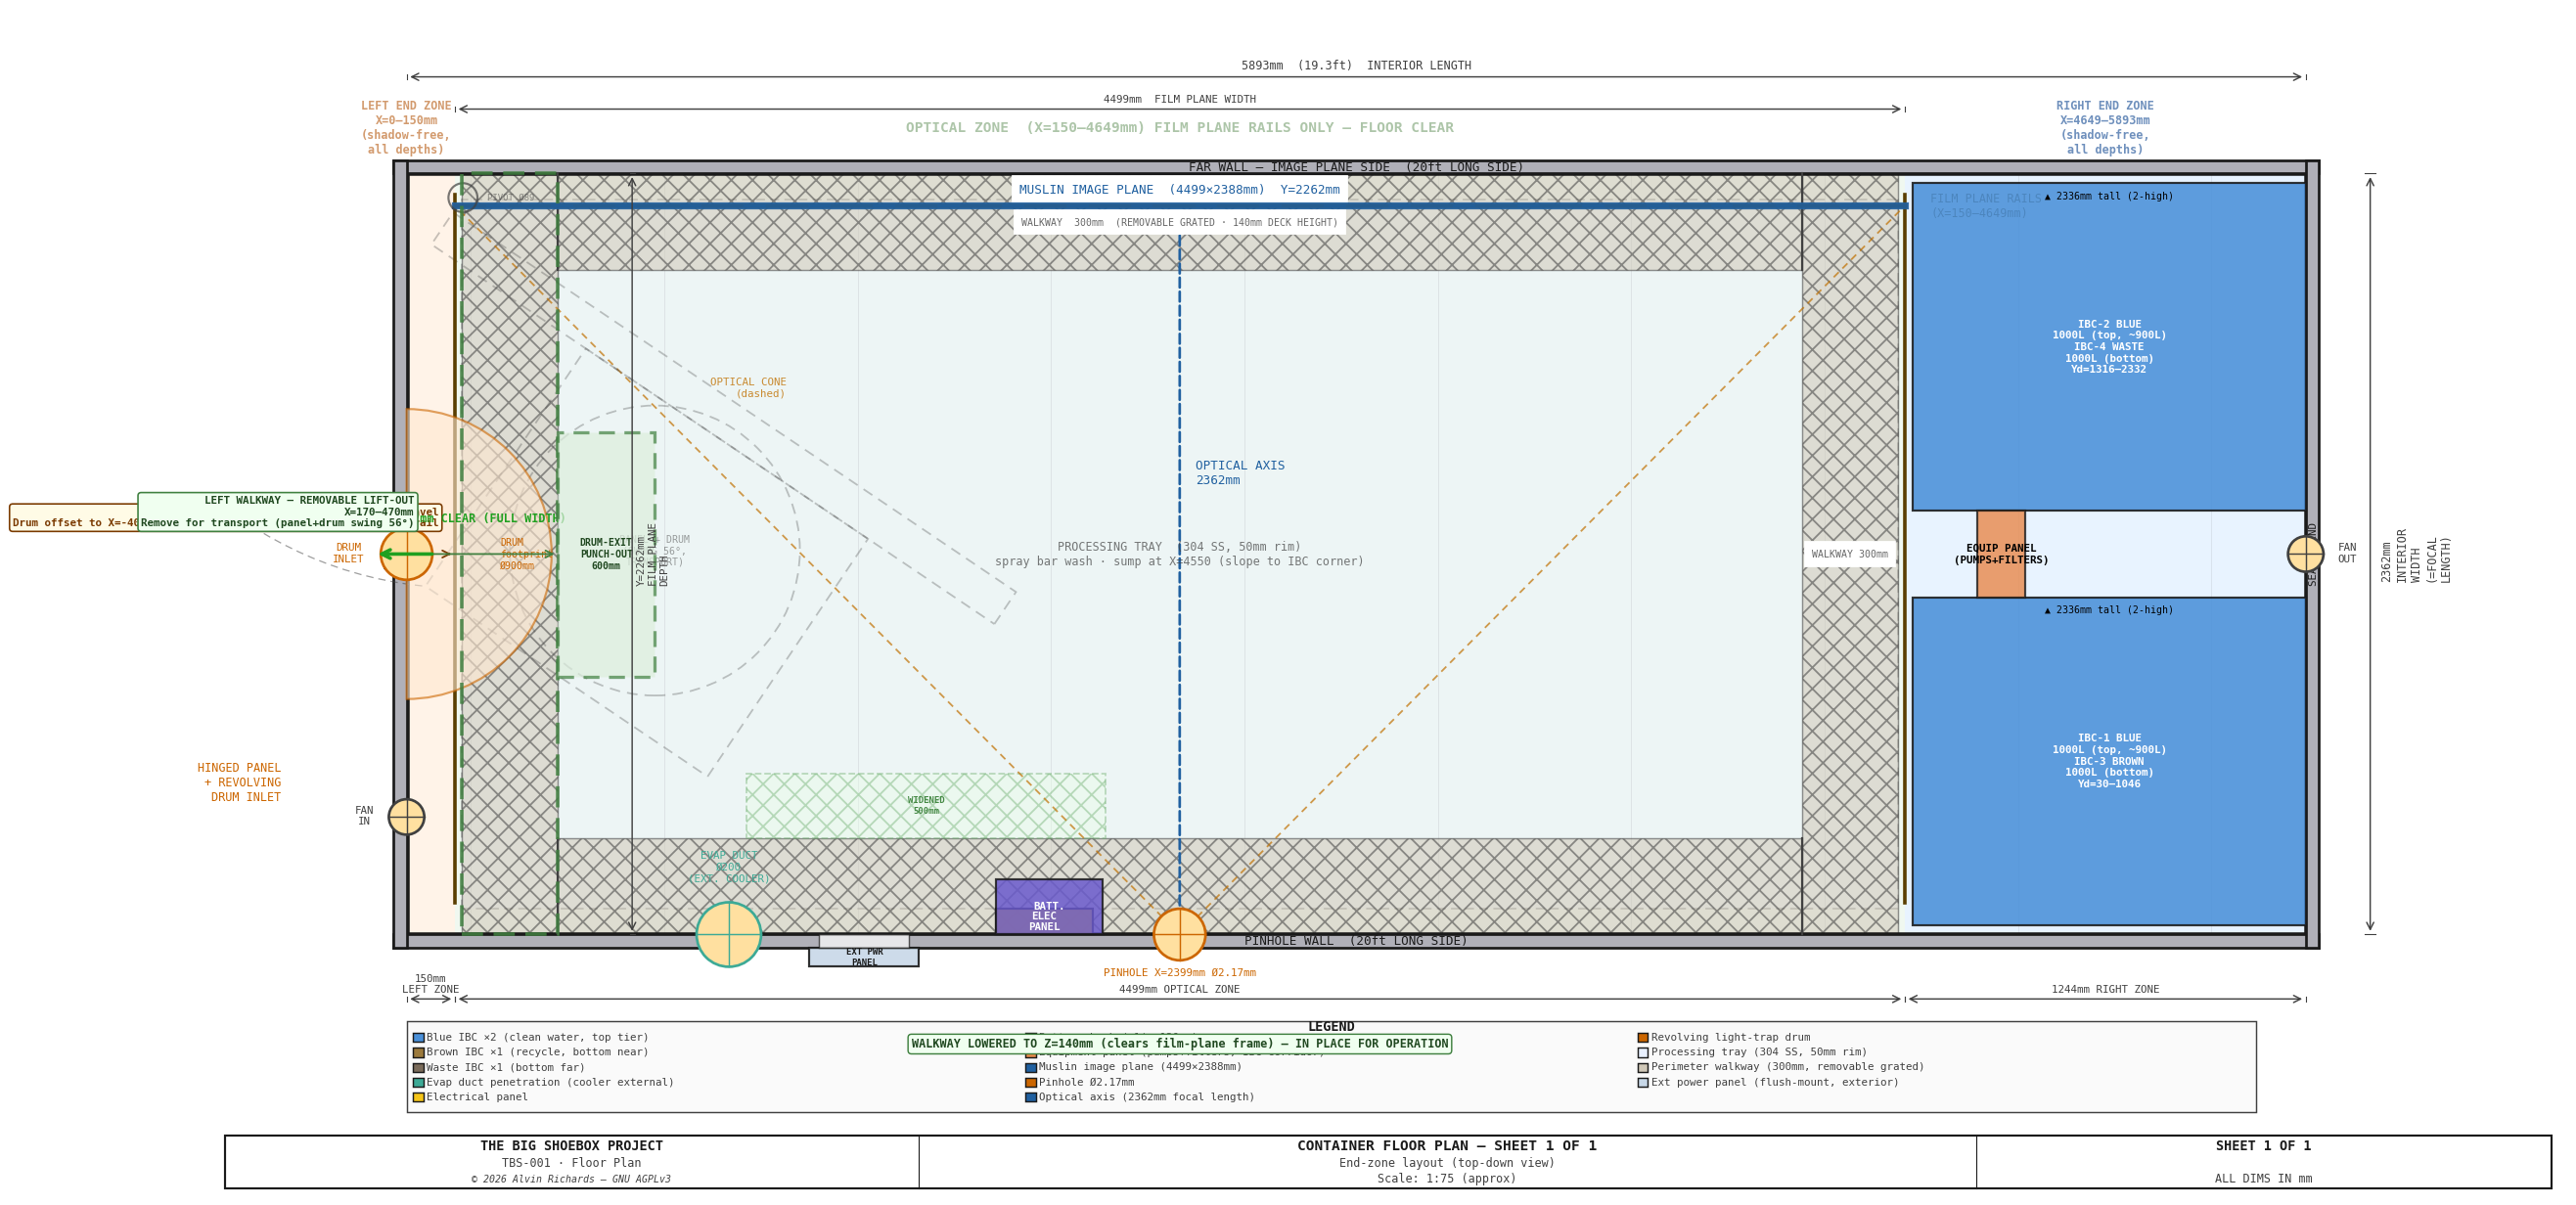
The floor plan below shows the container interior from above (top-down view) with all major systems in their installed positions. The long axis (image width) runs left-right in this view; the optical axis runs front-to-back, from the pinhole on the near long wall to the film plane on the far long wall at 2,262mm depth. Equipment occupies the two end zones — the light-trap drum at the far left and the IBC stack with its pump panel at the far right — leaving the central span (the active film-plane width) as the clear optical zone.
| Zone | Contents |
|---|---|
| Left end zone | Light trap drum, hinged panel |
| Right end zone | IBC totes (×4, 2×2 stack), pump manifold (equip panel), filter skid |
| Pinhole wall | Full-length wall: electrical panel, battery bank, evap duct penetration (cooler external) |
| Optical zone | Clear — no equipment; optical cone from pinhole traverses this central span unobstructed |
| Cargo door end | Hinged panel with integrated revolving light-trap drum |
| Pinhole aperture | Aperture Ø2.17mm at Y_depth=0 |
| Film plane | Muslin sensitized surface, spanning the active 4,389mm × 2,094mm (X=260–4,649mm) |
See Engineering Diagrams §3 for the full floor plan drawing, and §13 for the optical line-of-sight clearance analysis.
Part 5: Container Proposals¶
Comparative Summary of Proposals¶
| Proposal 1 | Proposal 2 | Proposal 3 | Proposal 4 | |
|---|---|---|---|---|
| Container | 20 ft standard | 40 ft standard | 40 ft standard | Two 20 ft |
| Orientation | Side-to-side | Side-to-side | End-to-end | Side-to-side + darkroom |
| Image plane | 19'4" × 7'10" | Up to 39'5" × 7'10" | 7'9" × 7'10" | 19'4" × 7'10" |
| Focal length | 7'9" (2,362mm) | 7'9" (2,362mm) | 39'5" (12,013mm) | 7'9" (2,362mm) |
| Optimal pinhole | 2.17mm | 2.17mm | 4.87mm | 2.17mm |
| F-number | f/1088 | f/1088 | f/2467 | f/1088 |
| Horizontal FOV | 102° | 102°–137° | 11° | 102° |
| RC paper exp. (Schwarzschild-corrected) | ~43 min | ~43 min | ~4 hr 52 min | ~43 min |
| Cyanotype on muslin exp. (Ware New Cyanotype, no correction) | ~30–45 min | ~30–45 min | ~2.5–4 hr | ~30–45 min |
| Transport permit | None | None | None | None (2 loads) |
| Purchase price range | $1,800–$3,800 | $2,200–$5,700 | $2,200–$5,700 | $3,600–$7,600 |
| Darkroom included | No | No | No | Yes |
Proposal 1 — 20-foot Standard Container (The Entry Camera)¶
Recommended for: First build, testing, budget-conscious projects, single-operator deployments.
Container Specifications¶
| Spec | Value | Source |
|---|---|---|
| Exterior dimensions | 20 ft L × 8 ft W × 8 ft 6 in H | ISO 668; eveoncontainers.com |
| Interior dimensions | 19 ft 4 in L × 7 ft 9 in W × 7 ft 10 in H | ISO 668 (confirmed) |
| Tare weight (empty) | approx. 4,850 lbs (2,200 kg) | Hapag-Lloyd Container Spec |
| Steel wall thickness | 1.6mm corrugated Corten steel | Standard ISO construction |
| Floor | 28mm laminated bamboo or hardwood | Standard ISO construction |
| Door type | Double swing on one short end | ISO standard |
| Min. purchase grade | WWT (Wind & Watertight) | — |
Estimated Purchase Cost¶
| Condition | Approx. Price (2026 US market, indicative) | Source |
|---|---|---|
| As-Is | $800–$1,500 | Not recommended |
| WWT | $1,500–$3,000 | containermgt.com |
| Cargo Worthy | $2,000–$3,500 | Ibid. |
| One-Trip | $3,500–$5,000 | Ibid. |
| Delivery (short haul) | $300–$800 | Ibid. |
Camera Optics (Orientation B)¶
| Parameter | Value | Formula |
|---|---|---|
| Image plane dimensions | 19 ft 4 in × 7 ft 10 in (5,893mm × 2,388mm) | Interior long wall |
| Focal length | 7 ft 9 in = 2,362mm | Interior width |
| Rayleigh optimal pinhole | 2.17mm | d = 1.9 × √(2362 × 0.00055) |
| Petzval optimal pinhole | 1.78mm | d = 1.56 × √(2362 × 0.00055) |
| Design pinhole range | 1.8–2.2mm | Sweet spot |
| F-number (at 2.17mm) | f/1088 | f/d |
| Horizontal field of view | 102° | 2 × arctan(19.3 / (2 × 7.75)) |
| Vertical field of view | 53° | 2 × arctan(7.83 / (2 × 7.75)) |
| Resolution (lp/mm) | 0.69 lp/mm | d / (2 × 1.22 × λ × f) |
Exposure Times (Bright Sunlight, Sunny-16 conditions)¶
| Medium | ISO equiv. | Calculated | Corrected (p=0.85) |
|---|---|---|---|
| ISO 100 film | 100 | 46 sec | ~69 sec |
| Silver gelatin RC paper | ~6 | 12.8 min | ~43 min |
| Cyanotype on muslin (Ware New Cyanotype) — selected process | ~2–4 | ~30–45 min | no reciprocity failure (iron process) |
Reciprocity corrections for film and silver-gelatin paper per Schwarzschild law, p = 0.85; actual correction must be verified empirically with the specific lot used. Cyanotype — the selected TBS-001 process — is iron-based and exhibits no Schwarzschild reciprocity failure, so its ~30–45 min baseline (Mike Ware New Cyanotype on muslin, f/1088, full sun) needs no correction (see Pinhole Optics Report). Sources: Stroebel et al., Basic Photographic Materials and Processes, 3rd ed., Focal Press, 2009; Schwarzschild, K., The Astrophysical Journal, Vol. 11, 1900.
Transport Compliance¶
| Check | Result |
|---|---|
| Width (8 ft 0 in) | ✅ Under 8 ft 6 in federal limit |
| Height on chassis (8'6" + ~4') = 12'6" | ✅ Under 13'6" federal limit |
| Length (20 ft) | ✅ Under 53 ft |
| Gross weight at 80,000 lbs GVW | ✅ Empty container (~4,850 lbs) leaves ample margin |
| Permit required | None on Interstate highways |
Proposal 2 — 40-foot Standard Container (The Production Camera)¶
Recommended for: Full-scale production use, multiple image formats, maximum creative flexibility.
The 40-foot container uses the same width (same focal length, same f-number, same exposure times as Proposal 1), but delivers a dramatically wider image plane — up to 39'5" wide. This allows the image width to be chosen by masking the image plane: from the 20'×7' target up to the full 39'×7.8' panoramic format.
Container Specifications¶
| Spec | Value | Source |
|---|---|---|
| Exterior dimensions | 40 ft L × 8 ft W × 8 ft 6 in H | ISO 668 |
| Interior dimensions | 39 ft 5 in L × 7 ft 9 in W × 7 ft 10 in H | ISO 668 (confirmed) |
| Tare weight (empty) | approx. 8,160 lbs (3,700 kg) | Hapag-Lloyd Container Spec |
| Door type | Double swing on one short end | ISO standard |
| Min. purchase grade | WWT | — |
Estimated Purchase Cost¶
| Condition | Approx. Price | Source |
|---|---|---|
| WWT | $1,700–$4,500 | containermgt.com |
| Cargo Worthy | $2,500–$5,000 | Ibid. |
| One-Trip | $4,000–$6,500 | Ibid. |
| Delivery (short haul) | $500–$1,200 | Ibid. |
Camera Optics (Orientation B)¶
| Parameter | Value |
|---|---|
| Image plane dimensions (full) | 39 ft 5 in × 7 ft 10 in |
| Image plane (masked to target) | 20 ft × 7 ft (mask the rest) |
| Focal length | 2,362mm (same interior width as 20 ft container) |
| Rayleigh optimal pinhole | 2.17mm (identical to Proposal 1) |
| F-number | f/1088 (identical) |
| Horizontal FOV (full 39' width) | 137° — extreme panoramic |
| Horizontal FOV (masked to 20') | 102° — same as Proposal 1 |
| Exposure times | Identical to Proposal 1 |
Creative note on 137° FOV: At full 39' width, the horizontal angle of view is 137°. Images at this angle exhibit barrel distortion at the edges — straight lines curve. This is a physical property of flat-plane projection at extreme angles, not a defect. Some photographers prize this quality. At 102° (masked to 20'), distortion is present but moderate. At 70° (masked to ~14' width), the image appears visually "normal."
Transport Compliance¶
Identical to Proposal 1 — standard 8'6" height is within federal limits on a container chassis. A 40-foot container uses a longer chassis; total rig length (tractor + chassis) is typically 58–65 ft, within legal limits for semi-trailer combinations.
Proposal 3 — 40-foot Standard Container (Telephoto/Portrait Orientation)¶
For reference only — long exposures make this impractical for most applications.
This is Orientation A: pinhole on one short end, image on the opposite short end. The container's 39-foot interior becomes the focal length, producing a telephoto effect.
Camera Optics (Orientation A)¶
| Parameter | Value |
|---|---|
| Image plane | 7 ft 9 in × 7 ft 10 in (2,362mm × 2,388mm) |
| Focal length | 39 ft 5 in = 12,013mm |
| Rayleigh optimal pinhole | 4.87mm |
| F-number | f/2467 |
| Horizontal FOV | 11° (narrow, telephoto) |
| Calculated paper exposure (bright sun) | 1 hr 8 min |
| Corrected paper exposure (p=0.85) | ~4 hr 52 min |
| Cyanotype exposure (Ware New Cyanotype, no correction) | ~2.5–4 hr |
Verdict: At f/2467 with a ~5-hour corrected paper exposure — or a ~2.5–4 hr cyanotype exposure (the selected process, scaled from the f/1088 baseline; no reciprocity correction, as it is iron-based) — this orientation is not practical in a single outdoor session. It becomes viable with digital capture (CMOS sensor, which has no reciprocity failure) or with very fast emulsions. Noted here for completeness.
Proposal 4 — Dual 20-foot Containers: Camera + Darkroom¶
Recommended for: Permanent or semi-permanent installations; on-site processing without a separate facility.
Two 20-foot standard containers are positioned end-to-end or side-by-side on site:
- Container A (Camera): Configured exactly as Proposal 1 — pinhole camera with 2,362mm focal length and ~19' × 7.8' image plane.
- Container B (Darkroom): Outfitted as a field darkroom for developing and fixing the large-format prints on-site. Equipped with processing trays/tanks, chemistry storage, ventilation, safelighting, and wash station with plumbed water.
Advantages¶
- Self-contained: no external darkroom facility needed
- Modular: both units transport independently on standard trucks
- Processing can begin immediately after exposure
- Container B provides secure, climate-controlled storage for chemistry and materials
- Combined footprint: 20' × 16' side-by-side, or 40' × 8' end-to-end
Cost¶
Add the cost of a second 20-foot container (WWT, $1,500–$3,000) plus darkroom fit-out materials.
Part 6: Interior Conversion — All Proposals¶
Step 1: Light-Seal Inspection and Remediation¶
Before any modification, the container must be confirmed fully light-tight. Perform this test:
- Seal all doors and vents (use weatherstripping temporarily)
- Wait 15 minutes for eyes to dark-adapt
- Stand inside in complete darkness for 5 minutes
- Mark any pinpoints of light with chalk — these are leaks
Common leak locations: - Door seal perimeters (most common) - Corner post welds - Roof panel seams - Any previous holes (conduit, signage hardware, drain plugs)
Remediation materials: - Weatherstripping foam tape (D-profile, 1" × 3/8") for door seals - Black silicone sealant for weld seam gaps - 6-mil black polyethylene sheet (Visqueen) for interior lining over persistent seams - 2" black Gorilla Tape for secondary sealing
Precedent: "The Great Picture" (2006) used 24,000 sq ft of 6-mil black Visqueen, 1,300 gallons of foam gap filler, and 1.5 miles of 2" black Gorilla Tape to light-seal a 160'×45'×80' aircraft hangar. For an 8'×8'×20' container, the same materials apply at a fraction of the scale. Source: The Great Picture — Wikipedia
Step 2: Interior Paint¶
All interior surfaces must be matte black to prevent stray reflections from fogging the image.
Material: Flat/matte black latex paint, 0% sheen. Any major hardware brand (Sherwin-Williams, Benjamin Moore, Rust-Oleum) produces flat black interior paint.
| Surface | Coverage needed (20 ft container) | Notes |
|---|---|---|
| Two long walls | ~315 sq ft total | Primer + 2 coats |
| Two short walls | ~130 sq ft total | Primer + 2 coats |
| Ceiling | ~155 sq ft | Primer + 2 coats |
| Floor | ~155 sq ft | Consider non-reflective rubber mat instead |
| Total | ~755 sq ft | ~3 gallons flat black |
Step 3: Image Plane — Flat Backing System¶
The problem: Standard container long walls are corrugated steel. The corrugations are approximately 1.5 inches deep with 6-inch pitch. A photosensitive material applied directly to the corrugated surface will have waves in the image plane — out-of-focus zones at the corrugation peaks and troughs (depth of field for a pinhole camera is theoretically infinite, but material waviness causes uneven image registration).
Solution: Install a flat backing frame
Material options (in order of recommendation):
| Material | Thickness | Weight (19'×8' panel) | Notes |
|---|---|---|---|
| 3/4" Baltic birch plywood | 19mm | ~290 lbs | Strong, flat, accepts staples/pins for material mounting |
| 1/2" aluminum composite panel (ACM) | 12mm | ~95 lbs | Lighter, very flat, paintable — used for large format signage |
| 1" rigid foam board (Foamular) | 25mm | ~35 lbs | Lightest; pins hold material; less rigid over span |
Recommended: ACM (Aluminum Composite Material) panels, such as Dibond or 3A Composites Alucobond. Available in 4'×8' sheets; panels can be butt-jointed and seamed. Paintable with flat black; accepts liquid emulsion directly.
Mounting: Attach panel to the container's interior corrugated wall using through-bolts at the container's structural ribs (every 18"). The 1.5" corrugation depth spaces the flat panel off the wall, allowing some air circulation.
Note on embracing corrugation: For certain artistic applications, applying the photosensitive material directly to the corrugated wall surface creates a deliberate wave pattern in the image — the corrugations imprint into the photograph as a repeating texture. This is a defensible aesthetic choice and dramatically simplifies construction.
Step 4: Pinhole Wall Preparation¶
The pinhole goes in the center of the opposite long wall.
Location: Geometric center of the long wall horizontally (to equalize image distortion across the frame); vertically position at approximately 45% of the wall height from the floor (slightly below center to account for the fact that subjects are typically above the horizon line when the camera is on the ground).
Cutting the aperture opening: 1. Mark a 4-inch × 4-inch square at the chosen location 2. Use an angle grinder with metal cutting disc to cut through the corrugated steel wall 3. File edges smooth 4. Weld or bolt a steel backing plate (6" × 6" × 1/8" steel plate) over the opening, with a centered 1/2" hole for the precision aperture insert
Precision aperture plate: - 3" × 3" plate of 0.1mm stainless steel shim stock (available from McMaster-Carr, catalog #9709K1) - Pinhole laser-drilled or chemically etched to target diameter (1.8–2.2mm for Proposal 1/2) - Sourcing option: Lenox Laser (lenoxlaser.com) — custom pinholes in SS-302/304 with ±0.025mm tolerance, SEM-verified. lenoxlaser.com/blog/pinholes-and-apertures/
Shutter mechanism: - A 1/8" steel plate (10" × 8") slides in a channel welded over the aperture backing plate - Operate from outside the container by pulling a handle - Seal channel edges with light-tight foam weatherstripping - Optional: add a rope/cord to open/close from a distance during exposure
Step 5: Access Door — Hinged Light-Trap Panel¶
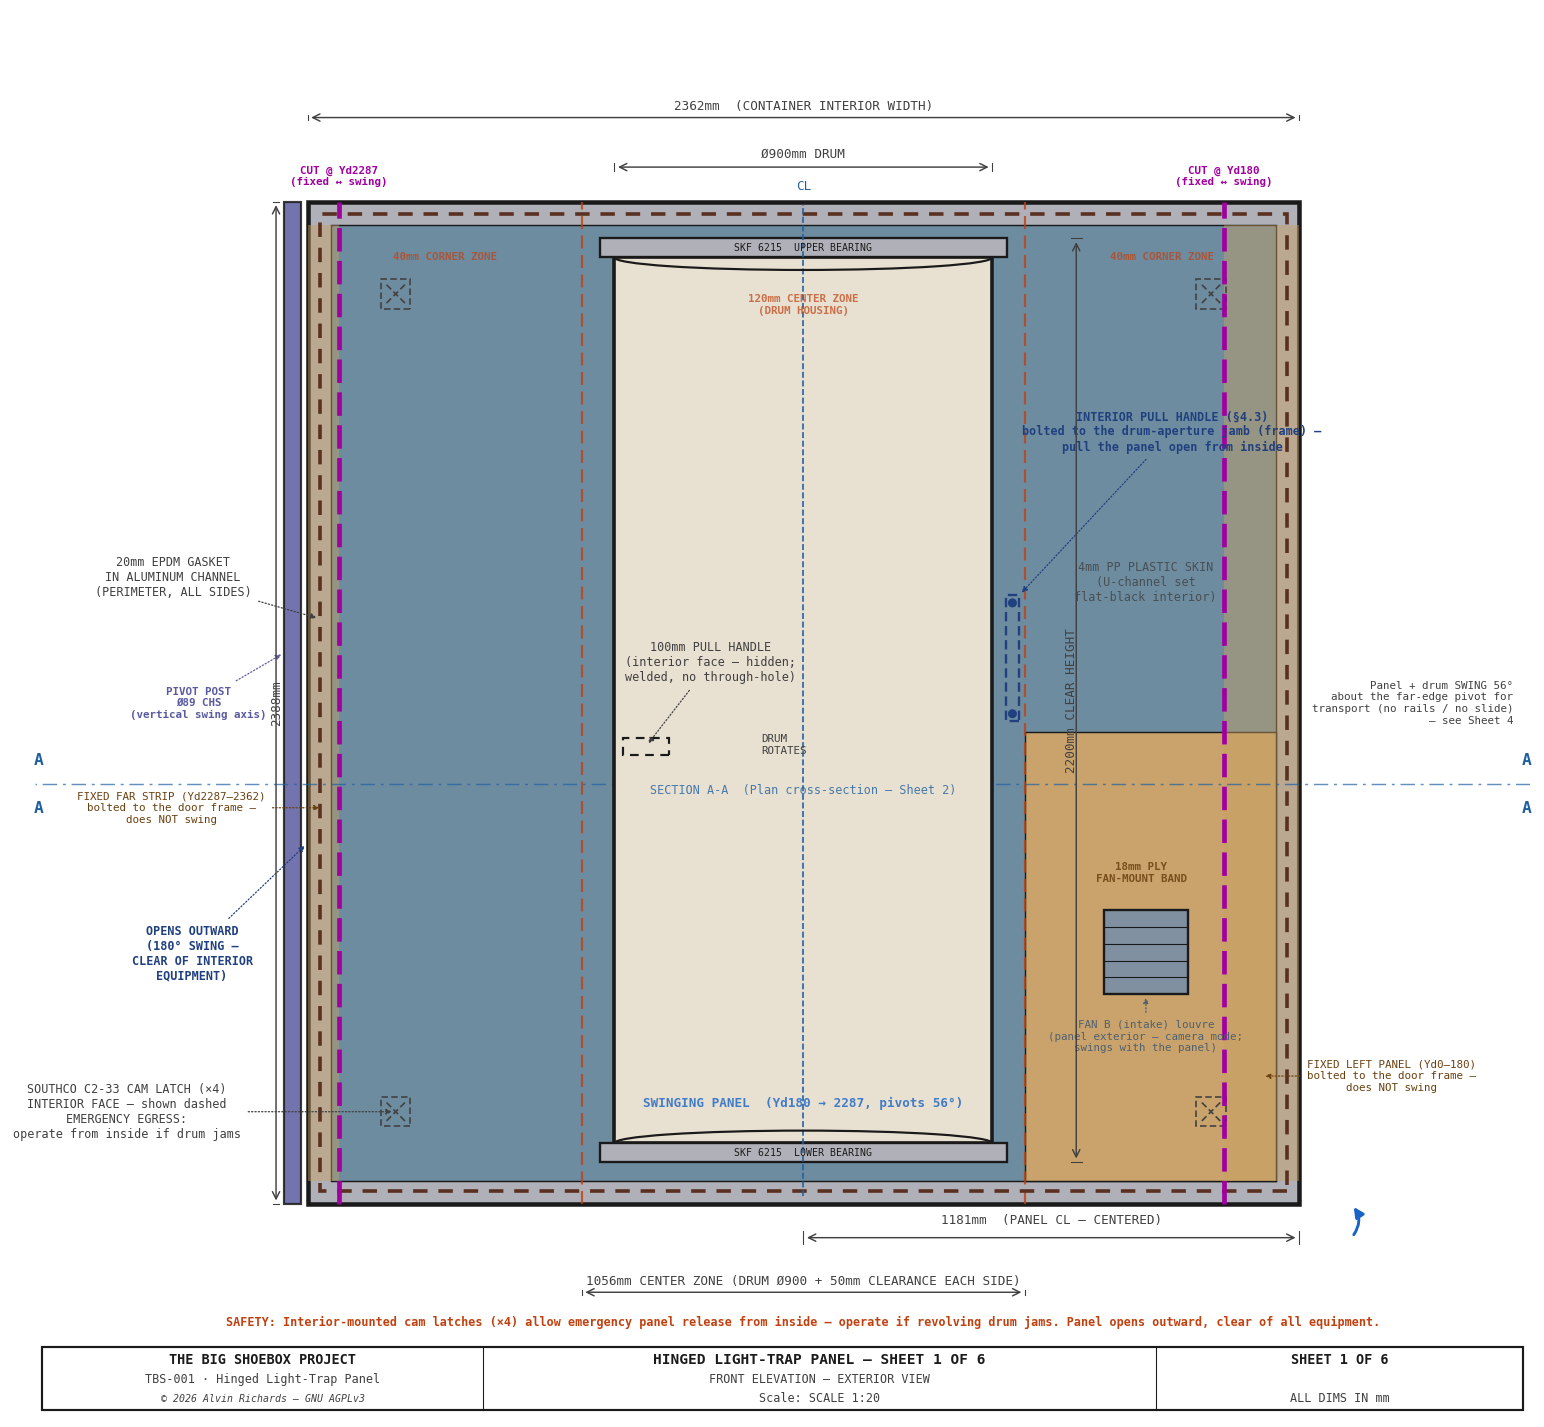
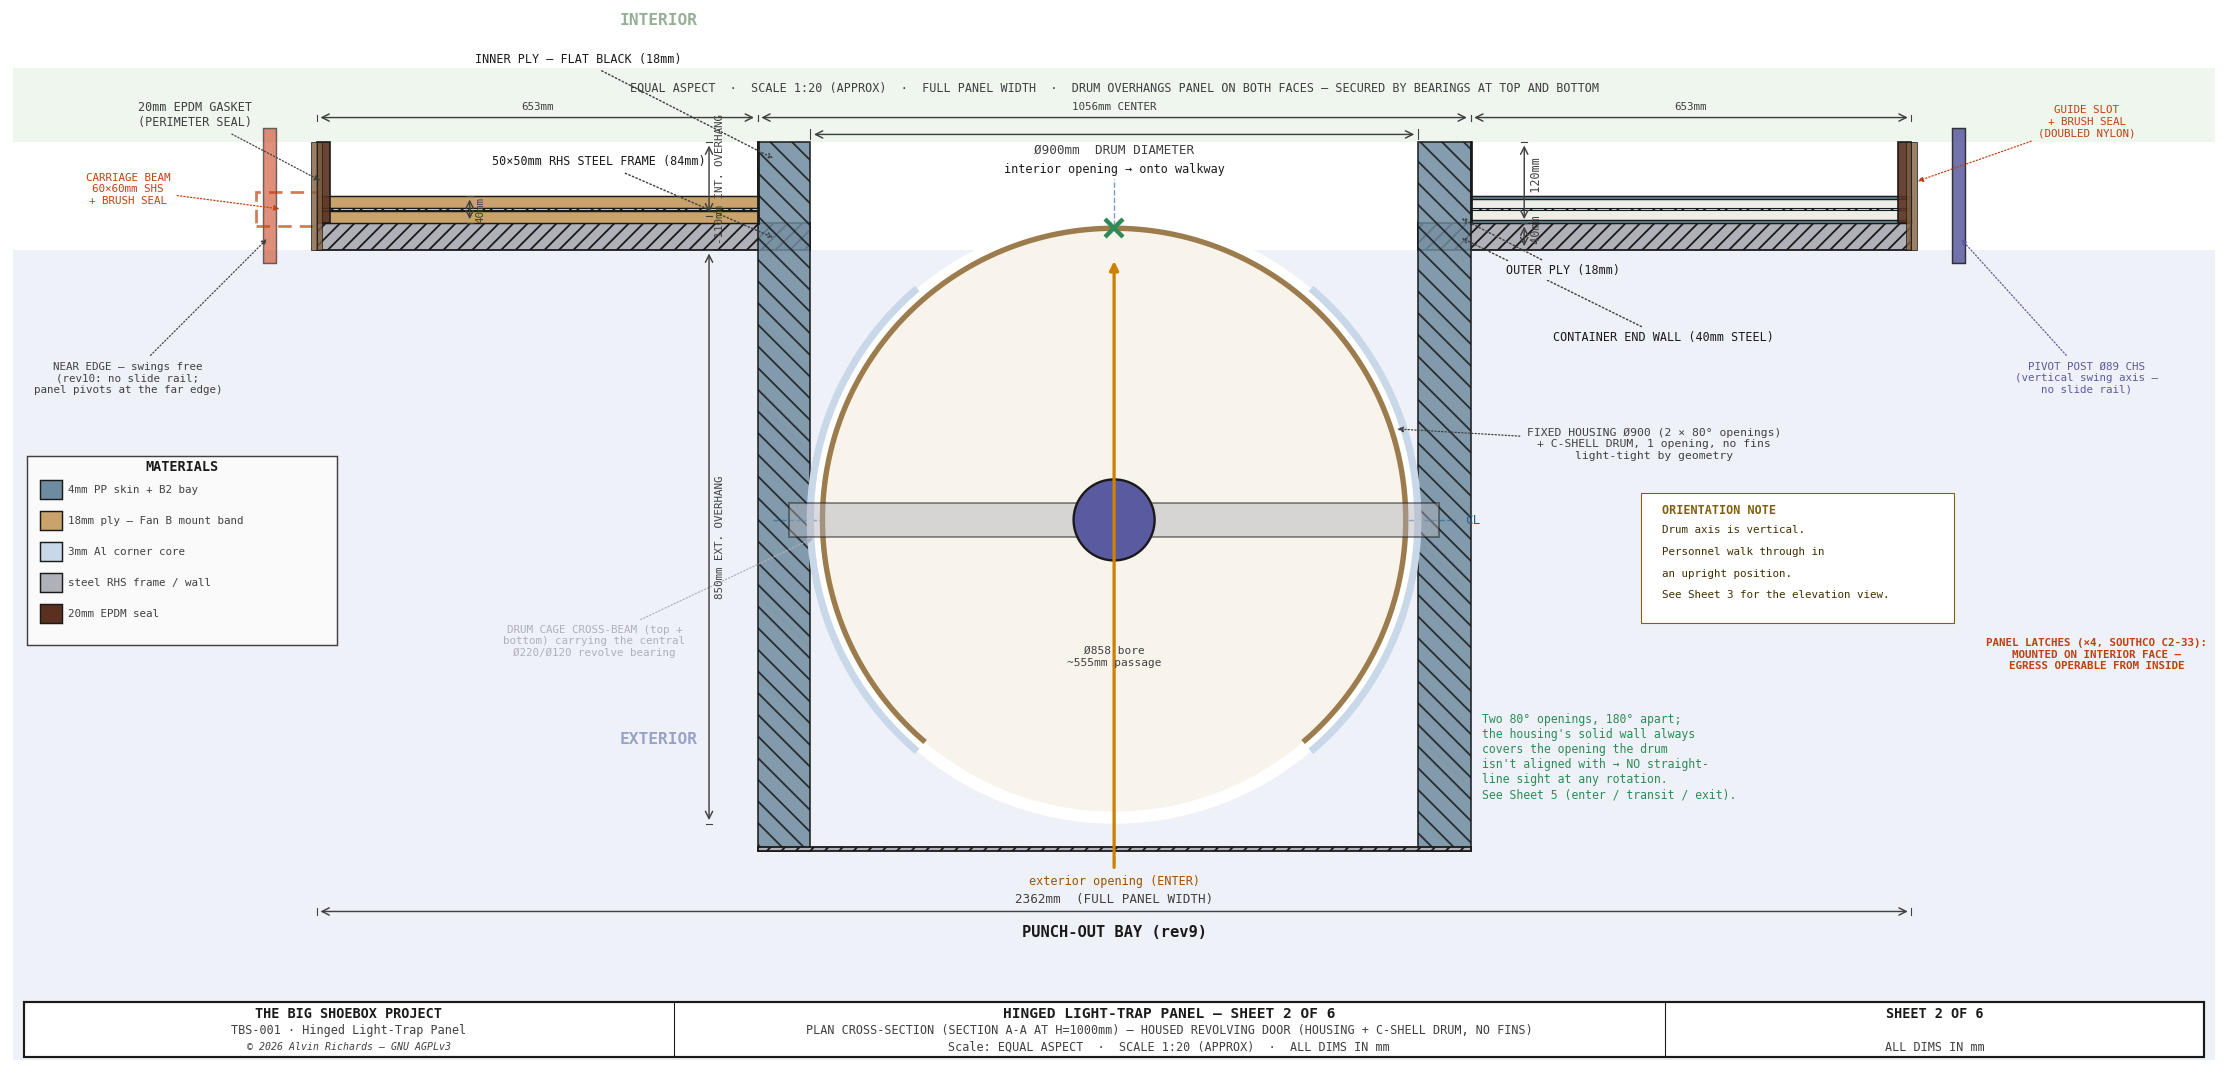
TBS-001 supplements the original cargo doors with a purpose-built stepped hinged panel incorporating a revolving light trap drum. This provides two things simultaneously: a light-tight seal for operations, and the ability to swing the full panel 180° open for loading IBC totes and equipment.
Panel design (see engineering drawings below): - 2,362 × 2,388mm stepped panel, 2×2×0.120in steel frame, 1/8" HDPE plastic skins (18mm-ply Fan-B band) - Stepped profile: 40mm thick at corner zones and 120mm thick at center zone where the light trap drum is mounted - Carried on a vertical Ø89×8mm CHS pivot post at the far-left edge (the reused film-plane far-left upright) on a thrust collar + top/bottom hub bearings — swings open about the pivot for access, and ~56° inboard for transport - 4 × Southco C2-33 cam compression latches at corners, compressing the 20mm EPDM perimeter + cut seals against a fixed welded door frame (2×2×0.120in steel SHS) - Ø900 housed revolving-door light lock (single-opening C-shell drum, no fins, SKF 6215 bearings) — personnel access without opening the panel; light-tight by geometry - Transport mode: panel + drum swing ~56° about the pivot, carrying the bay inboard of the door plane (clear +59mm) so the cargo doors close. Single-person operation (swing assisted), ~5 minutes. See Equipment Layout Report §6 for full specification.
Commercial light trap options and custom fabrication specification: Light Trap Selection Report
Sheet 1 — Front Elevation (1:20):
Sheet 2 — Plan Cross-Section: housed revolving door (housing, drum & light-tight geometry) (1:10 horiz / 1:1 depth):
Interior safelight: Install a red LED safelight (Circuit D, per Electrical Report) inside the container for loading operations. This also illuminates the drum interior so operators can orient themselves in darkness.
Step 6: Ventilation¶
For operations involving darkroom chemistry inside the container:
- Fan A (exhaust): 6" vent penetration on the sealed end wall, in the 270mm plumbing corridor directly below the X1 fill port — the only full-height clear channel past the 1,000L direct-stack (totes reach 2,336mm). Interior face covered with a 300mm deep light-trap baffle duct (L-shaped offset baffles, black sheet metal).
- Fan B (intake): 6" fan mounted low on the hinged panel (near corner zone by the pinhole wall, so its conduit runs along the pinhole wall without crossing the suspension rails). Baffle duct protrudes from the panel exterior face — draws fresh air from the open doorway during operation. Wiring via flexible coiled cable from fixed door frame to panel (see Electrical Report §8.3).
- During exposure: fans off
- During processing/loading: fans on for ventilation
Minimum ventilation requirement for darkroom chemistry: Acetic acid stop bath and sodium thiosulfate fixer both produce fumes. OSHA permissible exposure limit for acetic acid is 10 ppm (8-hour TWA). Forced ventilation during chemistry use is required.
Source: OSHA Table Z-1, Limits for Air Contaminants. US Occupational Safety and Health Administration.
| Recommended | ✅ First build | ✅ Full production | For digital only | ✅ Field deployment |
Part 7: Structural Considerations for Container Modification¶
Shipping containers are engineered to carry loads at the eight corner castings — the steel fittings at each corner. All primary structural force flows through the four vertical corner posts. The corrugated walls, roof, and floor are not the primary structure.
What this means for modifications: - Cutting holes in the long walls (for the pinhole, vents, etc.) does not significantly weaken the container structure, provided no corner posts are cut - Maximum single hole size in a non-structural corrugated panel: manufacturer guidance varies; for circular holes, up to 4 inches diameter is conservative and well within established practice for container conversions - Larger openings (doors, windows) require steel reinforcement framing welded around the perimeter of the opening
For our camera: - The 4" × 4" pinhole opening requires no structural reinforcement - The image plane backing panel attachment requires bolting to the structural ribs (vertical corrugation crests) — not to the flat web between ribs
Source: Container conversion engineering — cutting non-structural wall panels while preserving the corner posts — is a well-documented practice. Structural performance requirements for freight containers are defined by ISO 1496-1 (Series 1 freight containers — Specification and testing), consistent with the corner-casting load paths detailed in the Hapag-Lloyd Container Specification.
Part 8: Sourcing Containers — Where to Buy¶
Online Marketplaces¶
| Vendor | Notes | URL |
|---|---|---|
| Boxhub | Online purchase, nationwide delivery, grade-verified | boxhub.com |
| Container Management | Price comparison across depots | containermgt.com |
| IronPlanet / Ritchie Bros. | Auction-based; inspect before bidding | ironplanet.com |
Container Depots (Direct Purchase)¶
Major shipping lines maintain container depots near ports in every major US city. Purchasing directly from a depot (Maersk, MSC, CMA CGM authorized depots) is often cheaper than a reseller. Search "[city] shipping container depot" for local options.
Condition Inspection Before Purchase¶
Before purchasing WWT grade, request: 1. Interior photographs (4 walls, ceiling, floor) 2. Door seal photographs (gasket condition) 3. Roof inspection (rust, previous patching) 4. CSC plate (if CW grade — confirms inspection date and max stack weight)
A field inspection visit is strongly preferred for any unit over $2,500.
Part 9: Recommended Build Sequence¶
The following order minimizes rework and avoids modifying a container that fails the light-seal inspection.
- Acquire container — CW or WWT grade, inspect before accepting delivery
- Light-seal inspection — perform dark-adaptation test; mark all leaks
- Seal all existing leaks — weatherstripping, silicone, Visqueen, Gorilla Tape
- Re-inspect — repeat dark-adaptation test until zero light ingress
- Interior surface preparation — sand/clean walls, prime, paint matte black
- Install flat image plane backing — mount ACM panels or plywood on the image-plane wall
- Fabricate and install pinhole assembly — cut aperture opening, weld backing plate, install precision aperture
- Build and test shutter mechanism — confirm full seal when closed
- Install ventilation — cut vent penetrations, install fans and light-trap baffles
- Install safelight and door light-trap — for loading operations
- Test exposure — cut a 200mm × full-height strip of sensitized muslin, pin over the image plane center; expose for 20-minute intervals using a card mask, develop in plain water, compare zones to verify image formation and correct exposure time
- Full-format test — load full image plane, expose, develop
References¶
| Source | Relevance | URL |
|---|---|---|
| ISO 668:2020 | Container dimensions standard | via chs-containergroup.com |
| Hapag-Lloyd Container Specification | Industry-standard dimension and weight specs | hapag-lloyd.com PDF |
| FHWA Federal Size Regulations for CMVs | US permit-free transport dimensions | ops.fhwa.dot.gov |
| containermgt.com 2026 pricing | Container cost data | containermgt.com |
| CARU Containers FAQ | Container condition grade definitions | carucontainers.com |
| The Great Picture (Wikipedia) | Light-sealing precedent, materials list | en.wikipedia.org/wiki/The_Great_Picture |
| Lenox Laser | Precision pinhole fabrication | lenoxlaser.com |
| OSHA Table Z-1 | Ventilation requirements for darkroom chemistry | osha.gov |
| All optical formulas | See pinhole-optics-report.md | — |